Connecting to MSFT SQL Server Using R and odbc on Mac OSX

Adding this here to save the steps for when I need to setup additional Mac machines or need to update one. The purpose of setting this up is to be able to connect to MSFT SQL Servers from a Mac directly from R.

  1. Install homebrew if not already installed.
  2. Install the version of the driver that you want to use. I use ODBC Driver 17 for SQL Server.
  3. Tell R where to find the driver by adding the path to the .Renviron file. To find the location of this file, run:
    R.home(component = "home")
    in R. Then, add this line to the .Renviron file
    ODBCSYSINI=/opt/homebrew/etc
    . (Note that you should “show hidden files” if you’re using Mac’s Finder.)
  4. Close R and start a new session. You should be good to go.

SRM_R: A Web-Based Shiny App for Social Relations Analyses

Wong, M. N., Kenny, D. A., & Knight, A. P. (In Press). SRM_R: A Web-Based Shiny App for Social Relations Analyses. Organizational Research Methods.

Abstract. Many topics in organizational research involve examining the interpersonal perceptions and behaviors of group members. The resulting data can be analyzed using the Social Relations Model (SRM). This model enables researchers to address several important questions regarding relational phenomena. In the model, variance can be partitioned into group, actor, partner, and relationship; reciprocity can be assessed in terms of individuals and dyads; and, predictors at each of these levels can be analyzed. However, analyzing data using the currently available SRM software can be challenging and can deter organizational researchers from using the model. In this article, we provide a “go-to” introduction to SRM analyses and propose SRM_R (https://davidakenny.shinyapps.io/SRM_R/), an accessible and user-friendly, web-based application for SRM analyses. The basic steps of conducting SRM analyses in the app are illustrated with a sample dataset of 47 teams, 228 members, and 884 dyadic observations, using the participants’ ratings of the advice-seeking behavior of their fellow employees.

How to download YouTube videos

As a professor, I frequently use YouTube videos (and other streaming videos) in my courses. For a variety of reasons, I do not want to stream the video during a given class session. For example, if I am teaching a session virtually on Zoom, I do not want to simultaneously download and upload the video. Additionally, if I am teaching a course in China, I may not have access to YouTube. Finally, YouTube videos sometimes disappear, are blocked, or have advertisements that I don’t want to play in class.

For all of these reasons, I almost always download YouTube videos before class sessions and play them through my local machine. I never stream them directly from YouTube.

While there are a range of semi-functional browser plug-ins for downloading YouTube videos, I have never been satisfied with them. Instead, I use a command line tool — youtube-dl–for pulling videos from YouTube. It is an outstanding piece of (free) software that will enable you to quickly pull down videos to include in your classes.

The best way to install youtube-dl, if you’re on a Mac, is to use Homebrew. After doing so, you can run the following command in your shell (replacing {url} with the website address of the video you want to download:


youtube-dl "{url}"

For example, the following command would pull down an *amazing* video about recurrence analysis 🙂


youtube-dl "https://www.youtube.com/watch?v=wKOd45GLY9Y"

There are so many other options for this software. I think this is a particularly useful guide to using youtube-dl.

zoomGroupStats released on CRAN

zoomGroupStats is now available as a package on CRAN.

Title: zoomGroupStats: Analyze Text, Audio, and Video from ‘Zoom’ Meetings
Description: Provides utilities for processing and analyzing the files that are exported from a recorded ‘Zoom’ Meeting. This includes analyzing data captured through video cameras and microphones, the text-based chat, and meta-data. You can analyze aspects of the conversation among meeting participants and their emotional expressions throughout the meeting.


# To use the stable release version of zoomGroupStats, use:
install.packages("zoomGroupStats")

# To use the development version, which will be regularly updated with new functionality, use:
library(devtools)
install_github("https://github.com/andrewpknight/zoomGroupStats")

You can stay up-to-date on the latest functionality on http://zoomgroupstats.org.

Package version of zoomGroupStats

Thank you all for the encouragement and feedback on the initial version of zoomGroupStats. I can’t believe it’s been a little over a year since I posted the first set of functions in the early days of COVID-19. Following the suggestions of several users, I took some time this past week to build this out as a more structured R package.

Accompanying the package, you will find a multi-part guide for conducting research using Zoom and using zoomGroupStats to analyze Zoom meetings using R.

The best way to use this resource currently, because I am actively building out new functionality, is to install it through my github repository. To do so:


library(devtools)
install_github("https://github.com/andrewpknight/zoomGroupStats", force=TRUE)
library(zoomGroupStats)

I’ll be updating the documentation, guidance videos, and adding further functionality in the weeks ahead. The best resource for zoomGroupStats going forward will be a dedicated package site, which you can access at http://zoomgroupstats.org.

Please keep the feedback and suggestions coming!

Materials from zoomGroupStats Tutorial Session

I facilitated a short workshop to give an introduction to using the zoomGroupStats set of functions. The tutorial covered three issues. First, I offered recommendations for how to configure Zoom for conducting research projects. Second, I described how to use the functions in zoomGroupStats to parse the output from Zoom and run rudimentary conversation analysis. Third, I illustrated how to use zoomGroupStats to analyze the video files output from Zoom.

If you weren’t able to make it, here are a few artifacts from the session:

Presentation materials, which provided the structure for the session (but do not include the demonstrations / illustrations)

zoomGroupStats Tutorial Code, which walked through using different functions in zoomGroupStats

Supplementary Tutorial Guide, which accompanied the session to provide additional recommendations

A faster way to grab frames from video using ffmpeg

In the zoomGroupStats functions that I described in this post, there is a function for identifying and analyzing faces. The original version that I posted uses ImageMagick to pull image frames out of video files. This is embedded in the videoFaceAnalysis function. In practice, this is a very inefficient method for breaking down a video file before sending it off to AWS Rekognition for the face analysis. I’ve found that ImageMagick takes quite a long time to pull images from a video.

As an alternative, I’ve been using ffmpeg to process the video files before using the zoomGroupStats functions. I love ffmpeg and have used it for years to manipulate and process audio and video files. After you have installed ffmpeg on your machine, you can use system(“xxxx”) in the stream of your R code to execute ffmpeg commands. For example, here’s what I include in a loop that is working through a batch of video files:

ffCmd = paste("ffmpeg -i ", inputPath, " -r 1/", sampleWindow, " -fimage2 ", outputPath, "%0d.png", sep="")

Then, you can just run system(ffCmd) to execute this line. In the line, inputPath is the path to the video file, sampleWindow is the number of seconds that you would like between each frame grab, and outputPath is the path to the directory, including an image name prefix, where you want the images saved.

Using a computer that isn’t very powerful (a Mac Mini), I was able to break down 20 ~2 hour videos (about 2400 minutes of video) into frame grabs every 20 seconds (around 7000 images) in less than an hour.

I will end up replacing ImageMagick with ffmpeg in the next iteration of the videoFaceAnalysis function. This will also come with the output of new metrics (i.e., face height/width ratio and size oscillation). Stay tuned!

Use R to Transcribe Zoom Audio files for use with zoomGroupStats

The zoomGroupStats functions that I’ve been building over the past few months have, to date, relied heavily on the transcription that is created automatically when a meeting is recorded to the Zoom Cloud. This is an excellent option if your account has access to Cloud Recording; however, it can be an obstacle if you want meeting leaders to record their own meetings (locally) and send you the file. In a recent project, for example, I had many meeting leaders who accidentally recorded their meetings locally, which left me without a transcript of the meeting.

This week I’ve started building a set of functions to take in an audio file from a Zoom meeting (or could also take in the video file, but that is unnecessary) and output the same transcript object that the processZoomTranscript function in zoomGroupStats produces. These functions rely on AWS Transcribe and S3. There are currently just two functions — one that launches a transcription job (since these are done asynchronously) and the second that parses the output of the transcription job.

Note that these functions currently use the default segmenting algorithm in AWS transcribe. From reviewing several transcriptions, it’s not very good (in my opinion). If your work requires utterance-level analysis (e.g., average utterance length), I would consider defining your own segmentation approach. The functions will output a simple text file transcript, so you could use that to do a custom segmentation.

############################################################
# transcribeZoomAudio Function
############################################################

# Zoom Audio File Processing, Function to launch transcription jobs
# This function starts an audio transcription job only == it does not output anything of use. However,
# it is useful for batch uploading audio files and starting transcription jobs for them.

# This can be done with a local file (uploads to a specified s3 bucket) or with a file that already
# exists in an s3 bucket

# example call:             transcribeZoomAudio(fileLocation="local", bucketName="my-transcription-bucket", filePath="mylocalfile.m4a", jobName="mylocalfile.m4a", languageCode="en-US")

# INPUT ARGUMENTS:
# fileLocation:             either "local" or "s3" - if local, then this function will upload the file to the specified bucket
# bucketName:               name of an existing s3 bucket that you are using for storing audio files to transcribe and finished transcriptions
# filePath:                 the path to the local file or to the s3 file (depending on whether it is "local" or "s3")
# jobName:                  the name of the transcription job for aws -- I set this to the same as the filename (without path) for convenience
# numSpeakers:              this helps AWS identify the speakers in the clip - specify how many speakers you expect
# languageCode:             the code for the language (e.g., en-US)

# OUTPUT:
# None

transcribeZoomAudio = function(fileLocation, bucketName, filePath, jobName, numSpeakers, languageCode) {
    require(paws)

    # First, if the file location is local, then upload it into the
    # designated s3 bucket
    if(fileLocation == "local") {
        localFilePath = filePath
        svc = s3()
        upload_file = file(localFilePath, "rb")
        upload_file_in = readBin(upload_file, "raw", n = file.size(localFilePath))
        svc$put_object(Body = upload_file_in, Bucket = bucketName, Key = jobName)
        filePath = paste("s3://", bucketName, "/",jobName, sep="")
        close(upload_file)
    }

    svc = transcribeservice()  
    svc$start_transcription_job(TranscriptionJobName = jobName, LanguageCode = languageCode, Media = list(MediaFileUri = filePath), OutputBucketName = bucketName, Settings = list(ShowSpeakerLabels=TRUE, MaxSpeakerLabels=numSpeakers))
}


############################################################
# processZoomAudio Function
############################################################

# Zoom Audio File Processing, process finished transcriptions
# This function parses the JSON transcription completed by AWS transcribe.
# The output is the same as the processZoomTranscript function.

# example call:             audio.out = processZoomAudio(bucketName = "my-transcription-bucket", jobName = "mylocalfile.m4a", localDir = "path-to-local-directory-for-output", speakerNames = c("Tom Smith", "Jamal Jones", "Jamika Jensen"), recordingStartDateTime = "2020-06-20 17:00:00", writeTranscript=TRUE)

# INPUT ARGUMENTS:
# bucketName:               name of the s3 bucket where the finished transcript is stored
# jobName:                  name of the transcription job (see above - i usually set this to the filename of the audio)
# localDir:                 a local directory where you can save the aws json file and also a plain text file of the transcribed text
# speakerNames:             a vector with the Zoom user names of the speakers, in the order in which they appear in the audio clip.
# recordingStartDateTime:   the date/time that the meeting recording started
# writeTranscript:          a boolean to indicate whether you want to output a plain text file of the transcript           

# OUTPUT:
# utterance_id:             an incremented numeric identifier for a marked speech utterance
# utterance_start_seconds   the number of seconds from the start of the recording (when it starts)
# utterance_start_time:     the timestamp for the start of the utterance
# utterance_end_seconds     the number of seconds from the start of the recording (when it ends)
# utterance_end_time:       the timestamp for the end of the utterance
# utterance_time_window:    the number of seconds that the utterance took
# user_name:                the name attached to the utterance
# utterance_message:        the text of the utterance
# utterance_language:       the language code for the transcript


processZoomAudio = function(bucketName, jobName, localDir, speakerNames=c(), recordingStartDateTime, writeTranscript) {
    require(paws)
    require(jsonlite)

    transcriptName = paste(jobName, "json", sep=".")
    svc = s3()
    transcript = svc$get_object(Bucket = bucketName, Key = transcriptName)
    # Write the binary component of the downloaded object to the local path
    writeBin(transcript$Body, con = paste(localDir, transcriptName, sep="/"))
    tr.json = fromJSON(paste(localDir, transcriptName, sep="/"))

    if(writeTranscript) {
        outTranscript = paste(localDir, "/", jobName, ".txt", sep="")
        write(tr.json$results$transcripts$transcript, outTranscript)
    }

    # This IDs the words as AWS broke out the different segments of speech
    for(i in 1:length(tr.json$results$speaker$segments$items)){

        res.line = tr.json$results$speaker$segments$items[[i]]
        res.line$segment_id = i
        if(i == 1) {
            res.out = res.line
        } else {
            res.out = rbind(res.out, res.line)
        }

    }

    segments = res.out 
    segment_cuts = tr.json$results$speaker$segments[,c("start_time", "speaker_label", "end_time")] 

    # Pull this apart to just get the word/punctuation with the most confidence
    # Not currently dealing with any of the alternatives that AWS could give
    for(i in 1:length(tr.json$results$items$alternatives)) {

        res.line = tr.json$results$items$alternatives[[i]]

        if(i == 1) {
            res.out = res.line
        } else {
            res.out = rbind(res.out, res.line)
        }

    }

    words = cbind(res.out, tr.json$results$items[,c("start_time", "end_time", "type")])
    words = words[words$type == "pronunciation", ]
    words_segments = merge(words, segments, by=c("start_time", "end_time"), all.x=T)

    words_segments$start_time = as.numeric(words_segments$start_time)
    words_segments$end_time = as.numeric(words_segments$end_time)

    words_segments = words_segments[order(words_segments$start_time), ]
    segment_ids = unique(words_segments$segment_id)
    i = 1


    segment_cuts$utterance_id = NA
    segment_cuts$utterance_message = NA
    for(i in 1:length(segment_ids)) {
        utterance_id = segment_ids[i]
        segment_cuts[i, "utterance_id"] = utterance_id     
        segment_cuts[i, "utterance_message"] = paste0(words_segments[words_segments$segment_id == utterance_id, "content"], collapse=" ")
    }  

    if(length(speakerNames) > 0) {
        user_names = data.frame(0:(length(speakerNames)-1), speakerNames, stringsAsFactors=F)
        names(user_names) = c("speaker_label", "user_name")
        user_names$speaker_label = paste("spk",user_names$speaker_label, sep="_")
        segment_cuts = merge(segment_cuts, user_names, by="speaker_label", all.x=T)
    }

    names(segment_cuts)[2:3] = c("utterance_start_seconds", "utterance_end_seconds")
    segment_cuts[, 2:3] = lapply(segment_cuts[, 2:3], function(x) as.numeric(x))
    segment_cuts = segment_cuts[order(segment_cuts$utterance_start_seconds), ]

    # Now turn these into actual datetime values
    recordingStartDateTime = as.POSIXct(recordingStartDateTime)
    segment_cuts$utterance_start_time = recordingStartDateTime + segment_cuts$utterance_start_seconds
    segment_cuts$utterance_end_time = recordingStartDateTime + segment_cuts$utterance_end_seconds

    # Create a time window (in seconds) for the utterances -- how long is each in seconds
    segment_cuts$utterance_time_window = as.numeric(difftime(segment_cuts$utterance_end_time, segment_cuts$utterance_start_time, units="secs"))

    # Prepare the output file
    res.out = segment_cuts[, c("utterance_id", "utterance_start_seconds", "utterance_start_time", "utterance_end_seconds", "utterance_end_time", "utterance_time_window", "user_name", "utterance_message")]

    # Mark as unidentified any user with a blank username
    res.out$user_name = ifelse(res.out$user_name == "" | is.na(res.out$user_name), "UNIDENTIFIED", res.out$user_name)      

    # Add the language code
    res.out$utterance_language = languageCode

    return(res.out)    

}

Meeting Measures: Feedback from Zoom

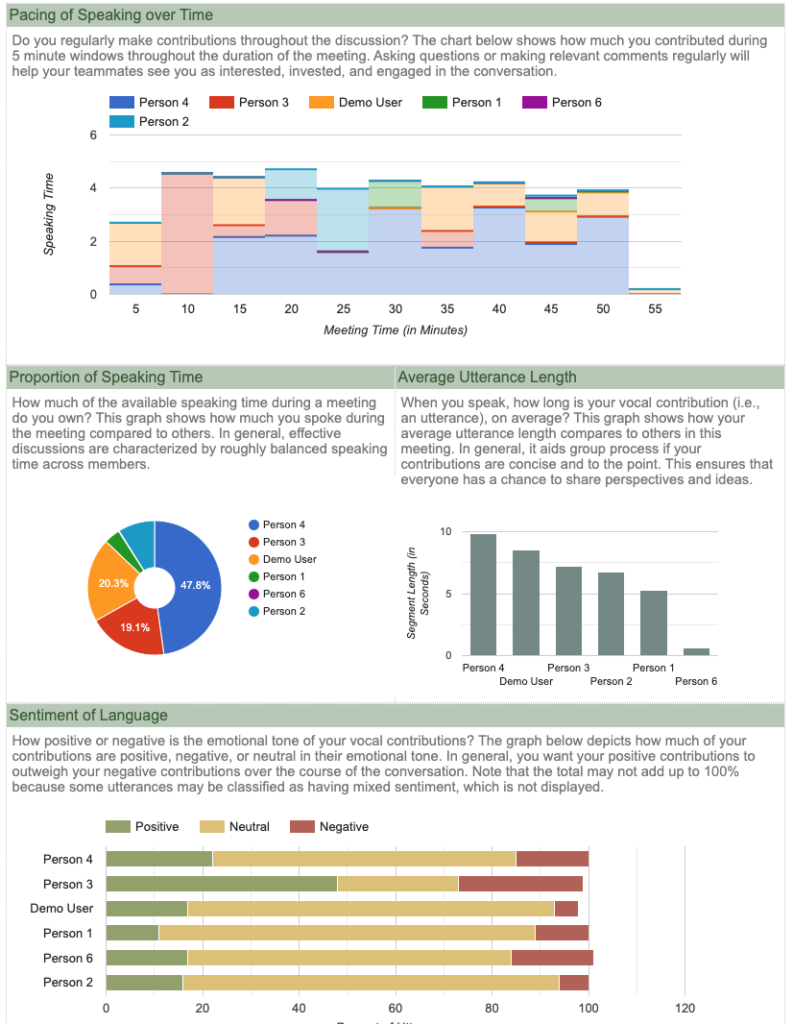
I created a website to give feedback to people on their virtual meetings. This website (http://www.meetingmeasures.com) relies on the code I’ve shared in past posts on how to quantify virtual meetings. The purpose of the site is to (a) unobtrusively capture people’s behavior in virtual meetings, (b) give people feedback on their presence and contributions in virtual meetings, and (c) suggest ways to improve their leadership and/or engagement in virtual meetings. There are currently options to incorporate survey data into the dashboard, as well.

This was a fun project to build. So far, I’ve administered > 100 meetings through the website. If you are interested in partnerships that involve the potential for research on virtual meeting behavior, please reach out.

Using R to Analyze Zoom Recordings

UPDATE: 2021-05-13: zoomGroupStats is now available as a package on CRAN.


# To use the stable release version of zoomGroupStats, use:
install.packages("zoomGroupStats")

# To use the development version, which will be regularly updated with new functionality, use:
library(devtools)
install_github("https://github.com/andrewpknight/zoomGroupStats")

You can stay up-to-date on the latest functionality on http://zoomgroupstats.org.

UPDATE: 2021-04-30: In response to prodding from several folks who have been using the functions, I have started to build these R functions for analyzing Zoom meetings as a package. I’m grateful for all of the feedback and suggestions for features and modifications to this project. Although things are still in flux, you can now access a package version of zoomGroupStats. The easiest way is to use the dev_tools package and install the current development version from my github repository. To do so, you can run:


library(devtools)
install_github("https://github.com/andrewpknight/zoomGroupStats", force=TRUE)
library(zoomGroupStats)

I have created a multi-part guide for using this package to conduct research using Zoom and analyze data from Zoom, which I will continue to extend and elaborate. To keep up-to-date on this work, please use the dedicated package website http://zoomgroupstats.org.

Please keep the feedback and comments coming!

UPDATE: 2021-02-12: I’ve updated several items in the package. I’m also going to moving the development and updates all over to github to ease version control and documentation. For now, here is a post that is from a recent live tutorial session I facilitated. Stay tuned!

UPDATE: 2020-07-27: The new file contains some alpha-stage functions for doing audio transcription and for conducting a windowed conversation analysis. I haven’t yet tested these functions extensively or commented the windowed conversation analysis. Once COVID teaching planning eases, I’ll get back in an update further.

UPDATE: 2020-04-14: I added a new function (textConversationAnalysis) that gives some very basic and descriptive conversation metrics from either the video transcript or the chat file.

You can always access the most recent version of the functions by including the statement source(“http://apknight.org/zoomGroupStats.R”) at the top of your code.

Alternatively, you could go to http://apknight.org/zoomGroupStats.R and copy/paste the code into your editor.

ORIGINAL POST FOLLOWS:

In response to the shift to so many online meetings, I created a set of R functions to help do research using web-based meetings. In brief, these functions use the output of recorded sessions (e.g., video feed, transcript file, chat file) to do things like sentiment analysis, face analysis, and emotional expression analysis. In the coming week, I will extend these to do basic conversation analysis (e.g., who speaks/chats most, turntaking).

I went overboard in commenting the code so that hopefully others can use them. But, if you’re still having trouble getting them to work, please don’t hesitate to reach out to me.

You can directly access the functions here:
http://apknight.org/zoomGroupStats.R

After reviewing this, you could call these functions using the following statement in R: source(“http://apknight.org/zoomGroupStats.R”)